Quickstart
A step-by-step walkthrough with a picture of every screen, from signing up to a new worker checking in at a customer's site and showing on the daily report.
This is the shortest path from signing up to seeing a new guard's check-in on the customer's daily report. Do the steps in this order, because each one needs the ones before it. Every step shows the screen and links to the full page for that feature.
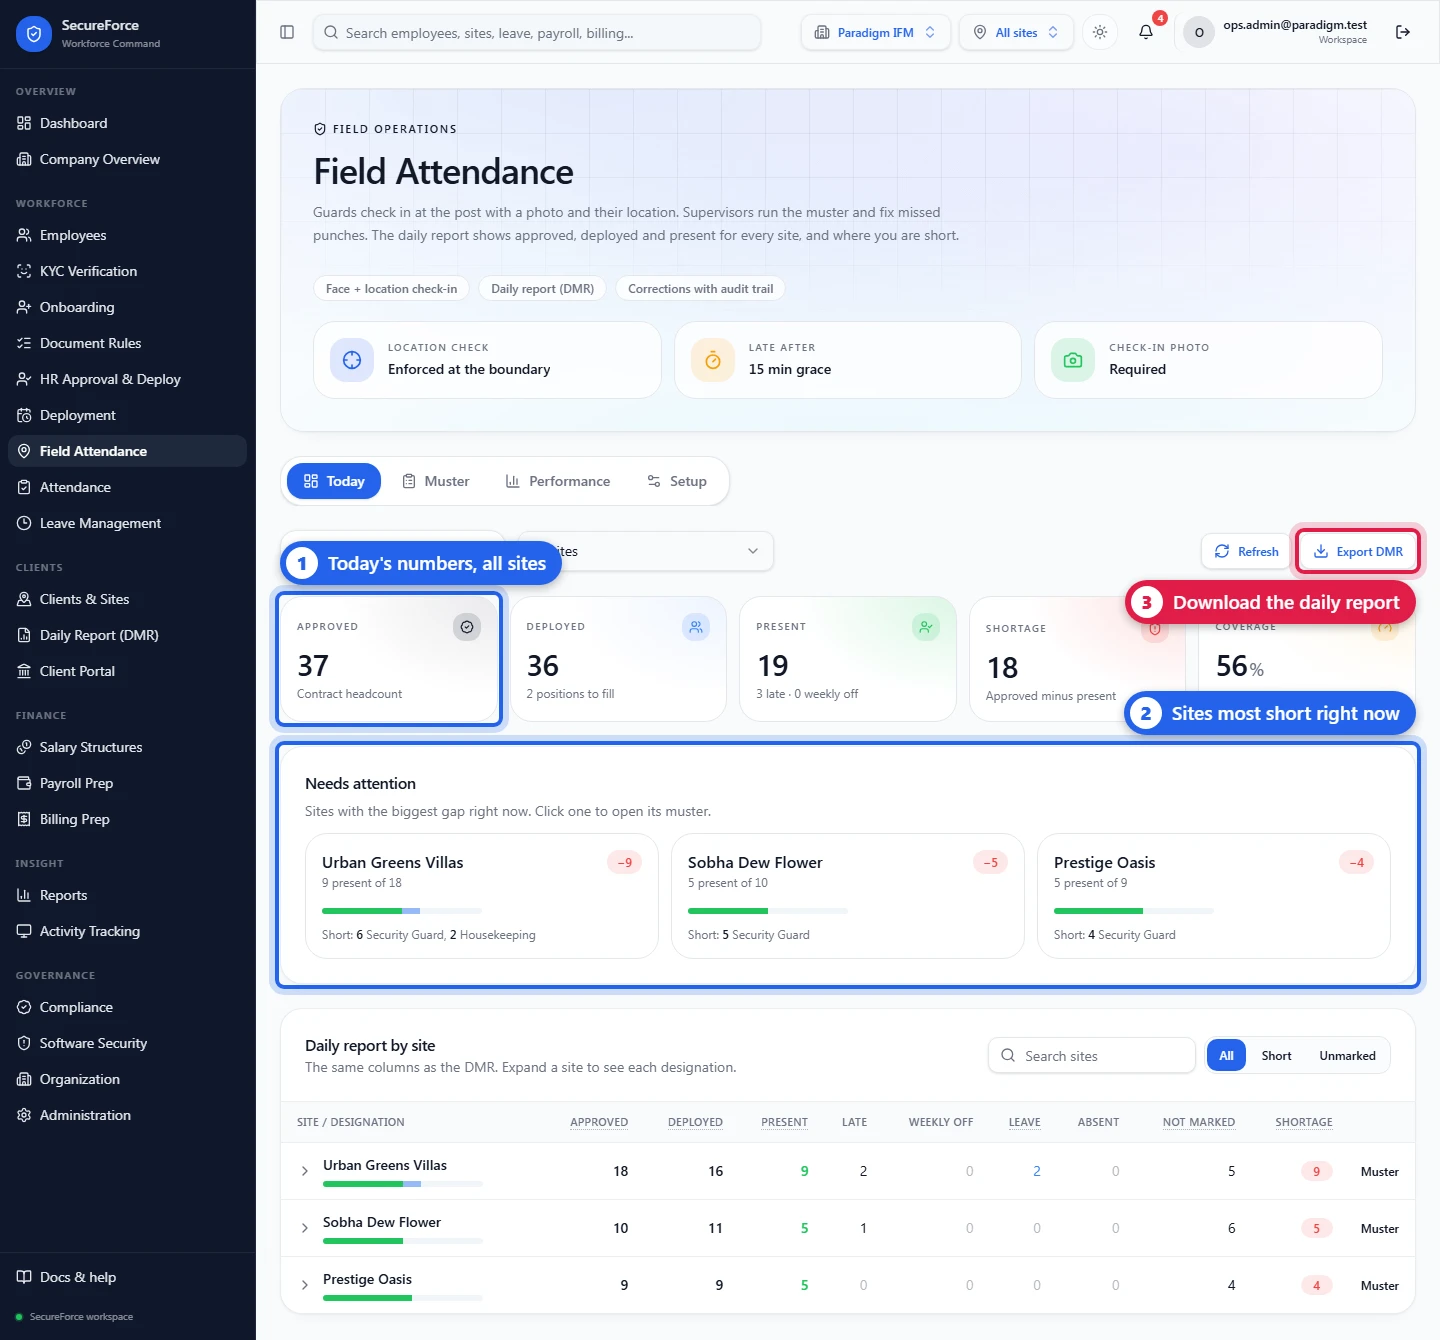
Reading the screenshots: a red numbered label is something you do (click, type or choose), in number order. A blue label is something to look at. Click any screenshot to open it full size.
1. Sign up
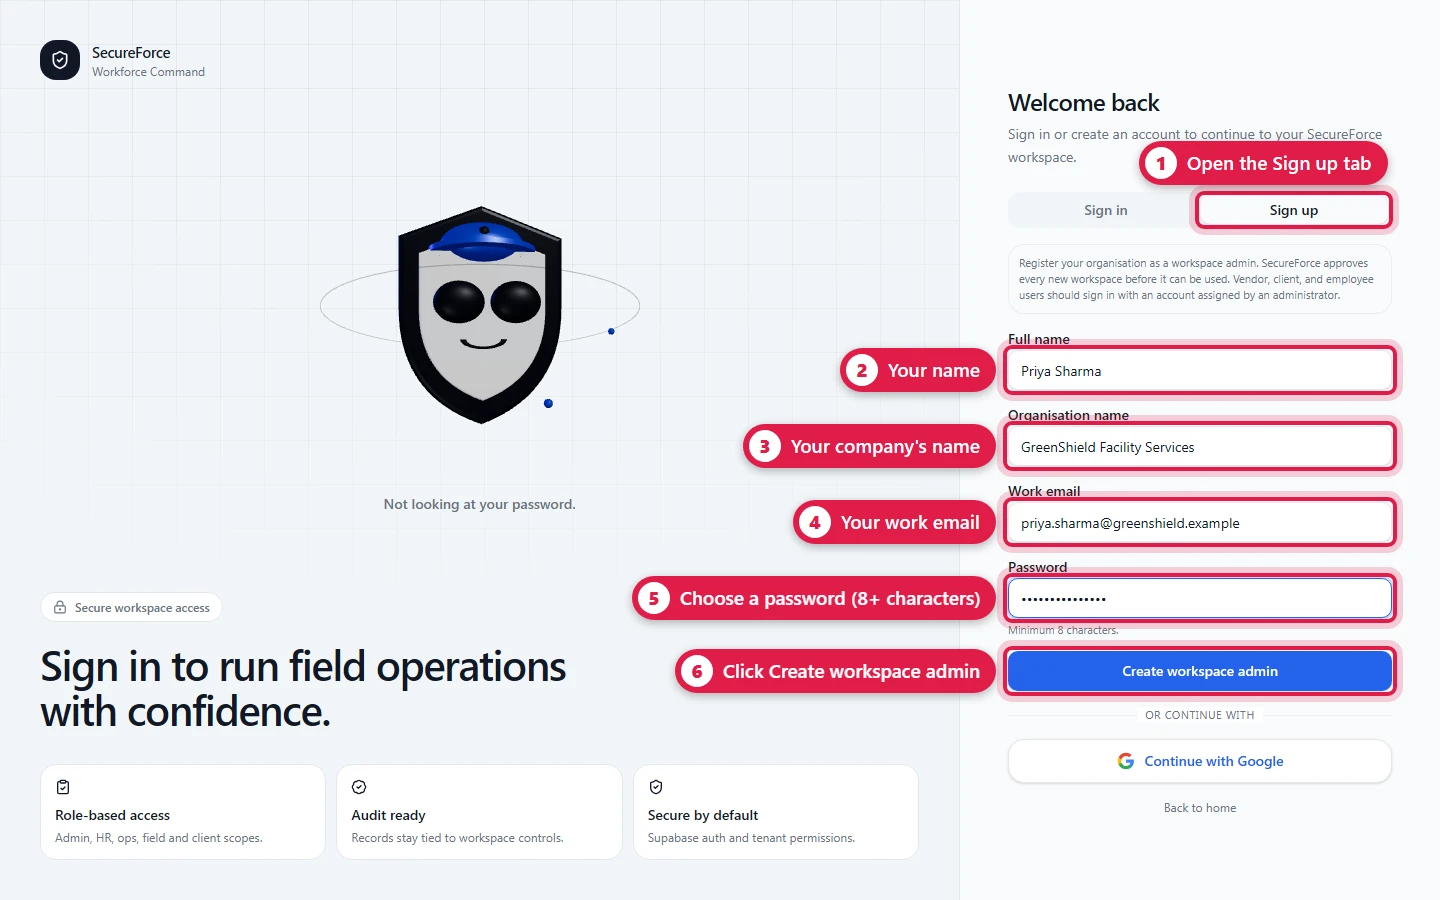
Open SecureForce, go to Sign up, and enter your name, your organisation name (e.g. Paradigm IFM), work email and a password. Press Create workspace admin. You become the Admin of a workspace named after your organisation.
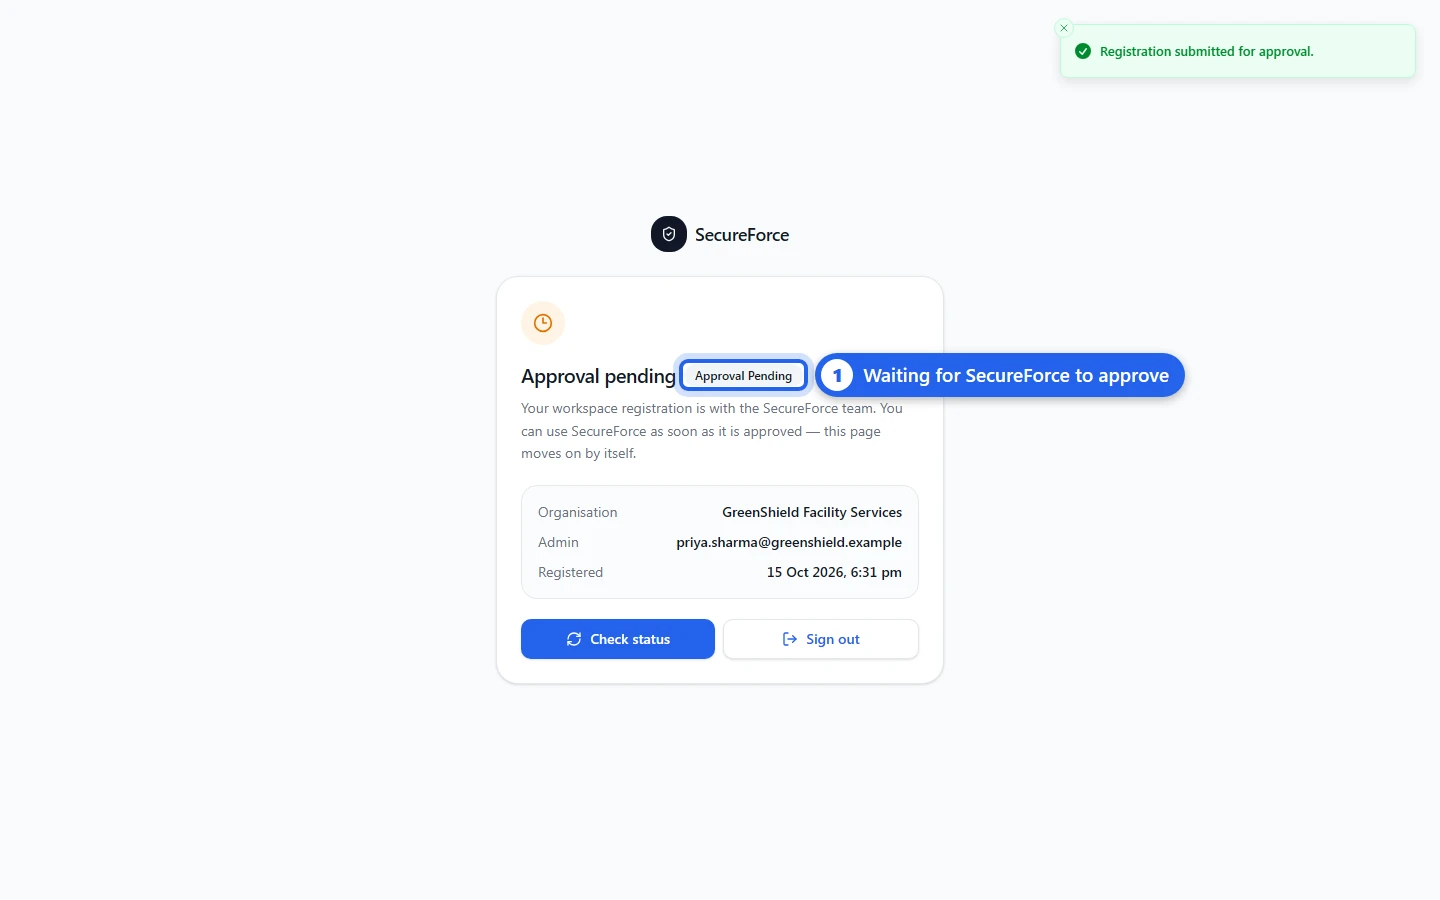
The workspace starts as Approval Pending until the SecureForce team approves it. The page moves on by itself once approved, or press Check status.
More: Workspace.
2. Find your way around
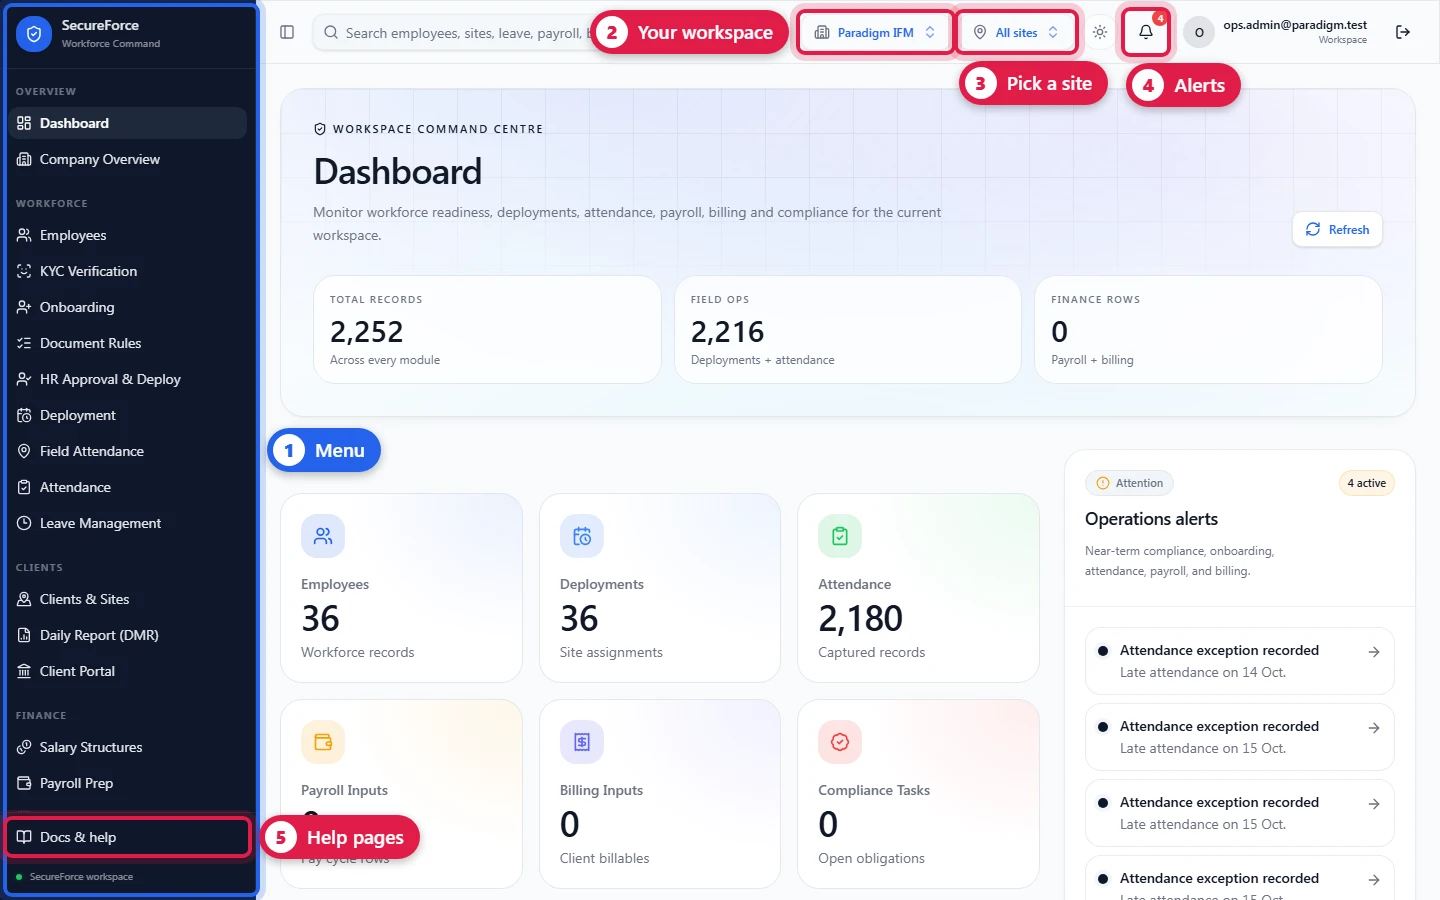
Every module is in the left menu. At the top: the workspace you're in, the site picker (All sites or one site), notifications, and Docs & help for these pages.
More: Dashboard and reports.
3. Describe your company
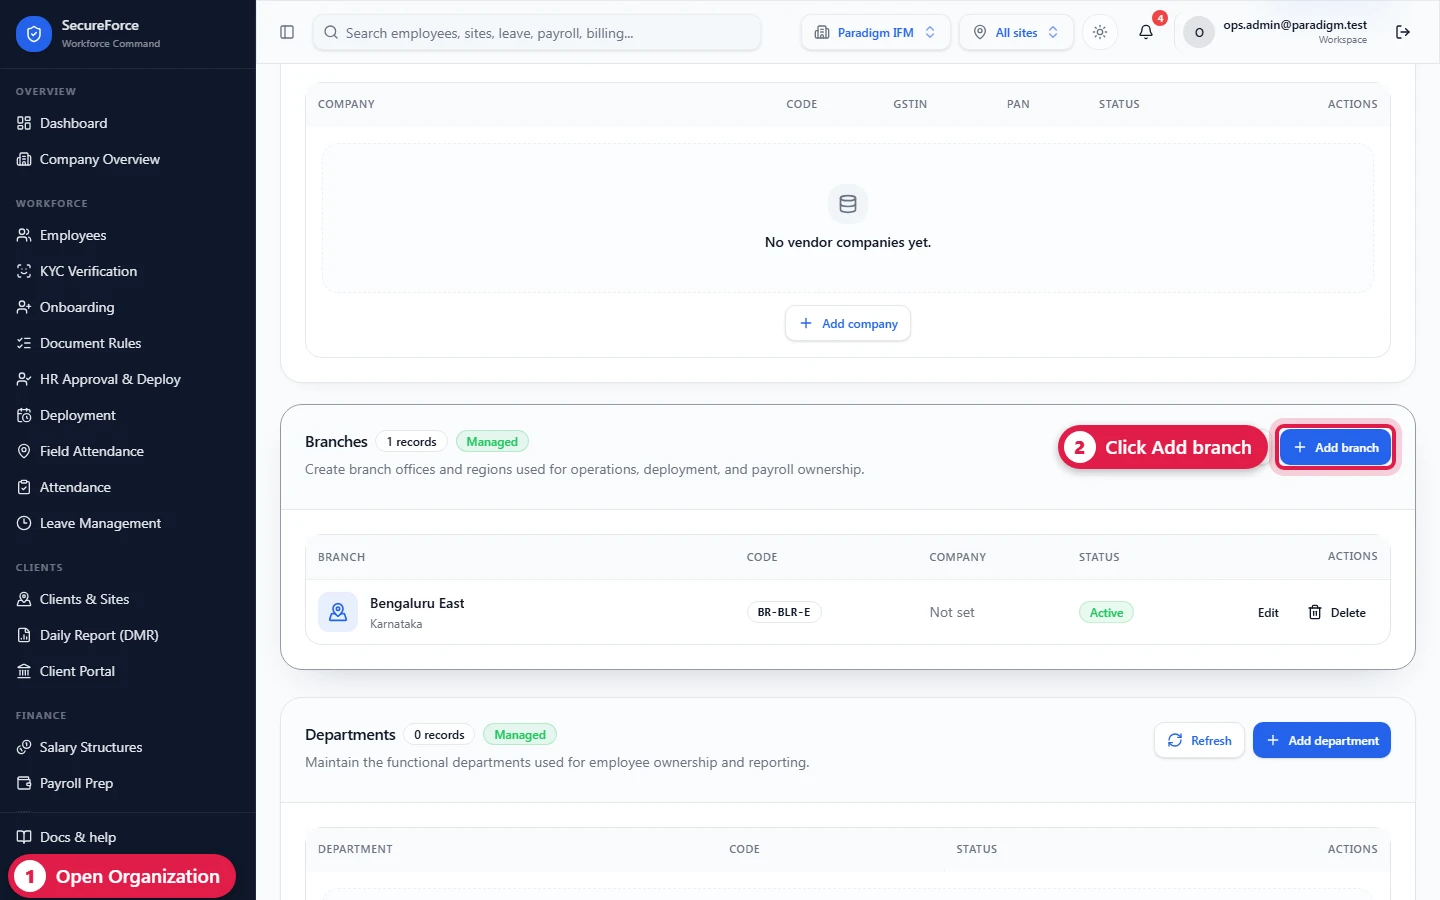
Sidebar → Organization: add your branches (e.g. Bengaluru East), and if you use them, companies, departments, service lines and grades.
More: Organization.
4. Give your team their logins
Sidebar → Administration → Workspace Members → Add member. Supervisors and guards can sign in with their mobile number; pick their role, press Generate for a password, then Add member, and share the details yourself (no email is sent).
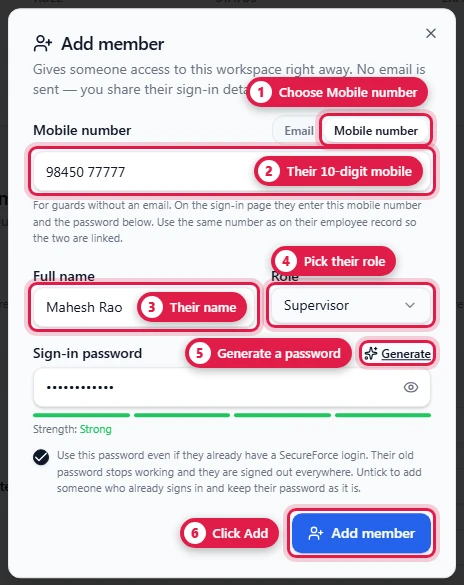
A supervisor should only see their own site: give them a site data scope. Guards get their login later (step 13), once their employee record exists. More: Administration.
5. Add the customer and their sites
Sidebar → Clients & Sites → Set up a customer. One wizard creates the customer group, its companies, contracts, sites (with the gate location and boundary) and the approved headcount per designation, the daily report's Total approved.
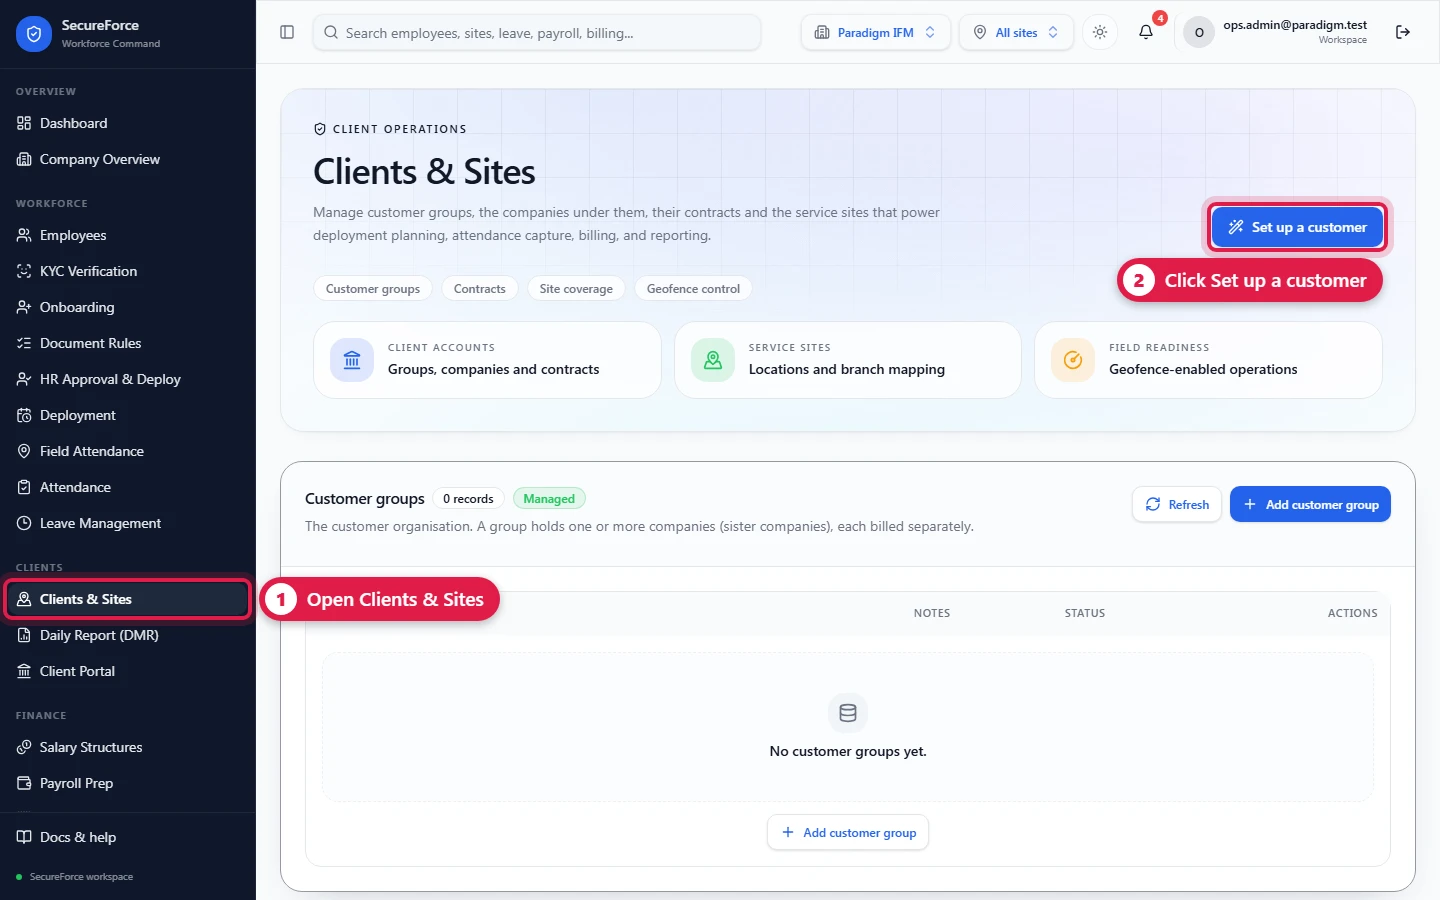
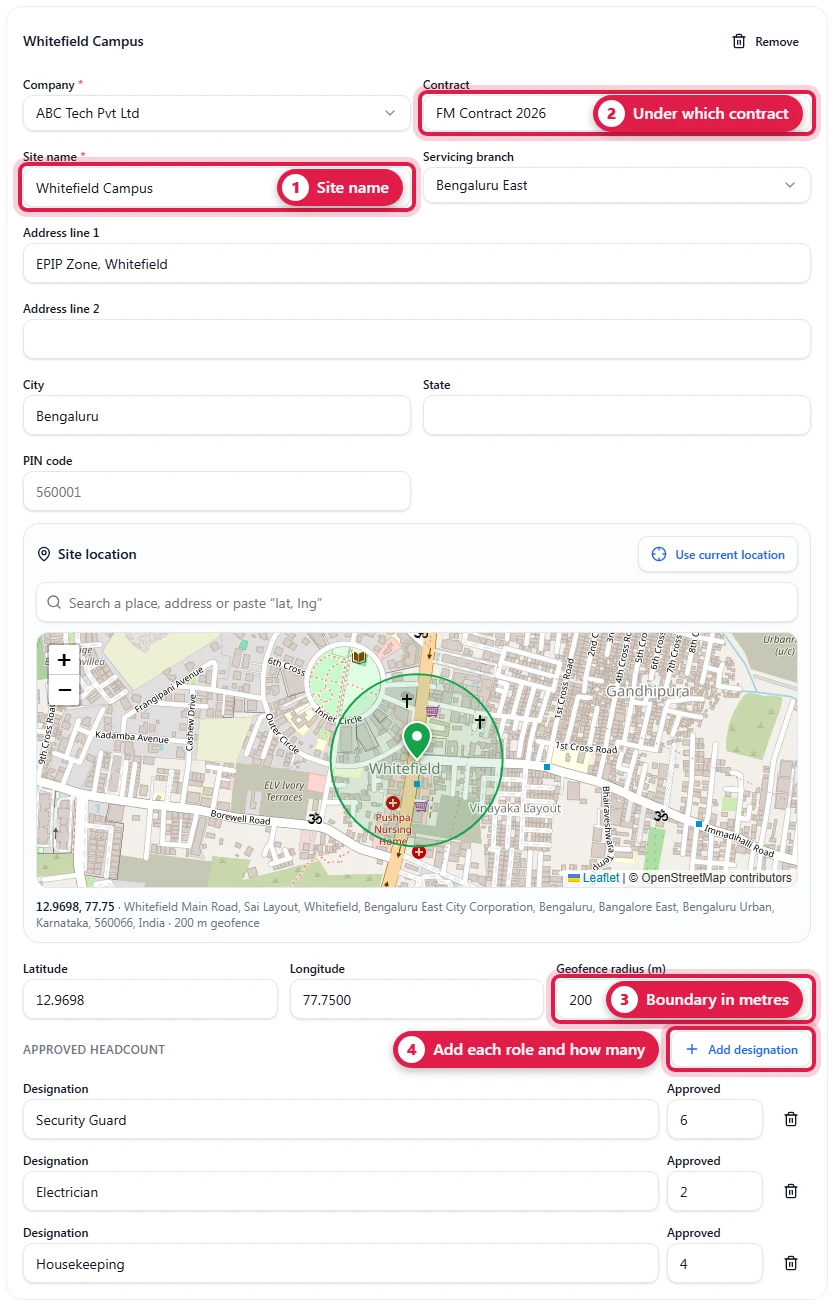
More: Customer setup, Clients and sites.
6. Set the attendance rules
Sidebar → Field Attendance → Setup: the Location check (Enforce refuses check-ins outside the boundary), Late after, and Photo at check-in and check-out. Press Save rules. The approved headcount per site is on the right if you need to change it.
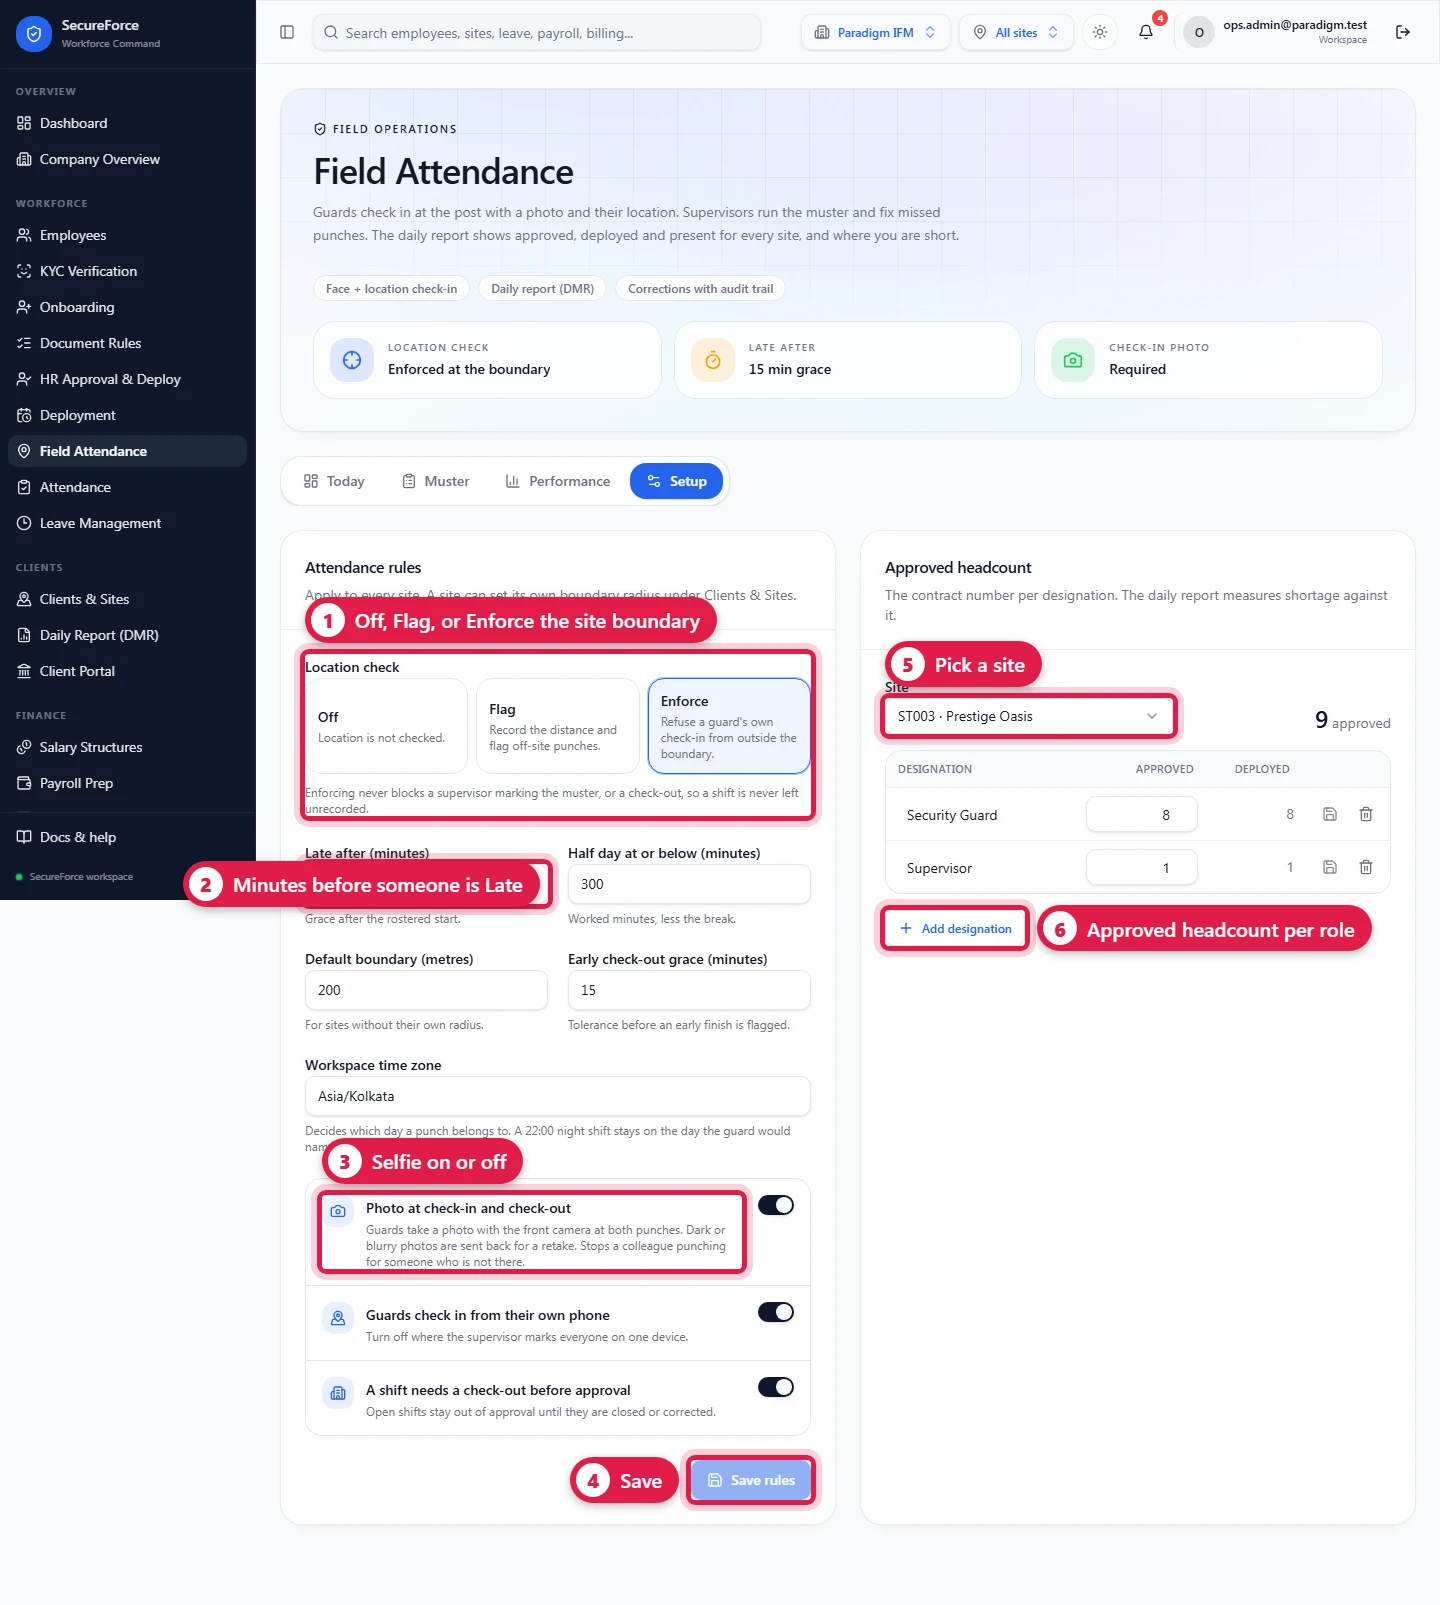
More: Field Attendance.
7. Create the shifts
Sidebar → Attendance → Add shift: name (Day), start and end time, break minutes, status Published.
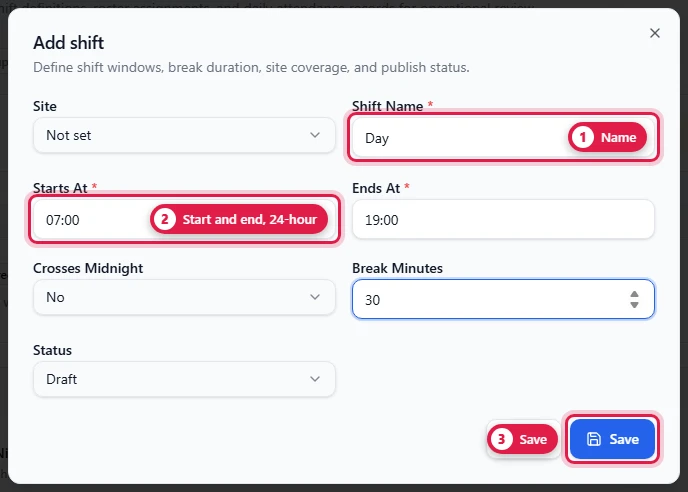
More: Shifts and roster.
8. Add the new worker
Sidebar → Employees → Add employee. Name, mobile number and an emergency contact are required. Many workers at once? Use Bulk Onboarding with a spreadsheet.
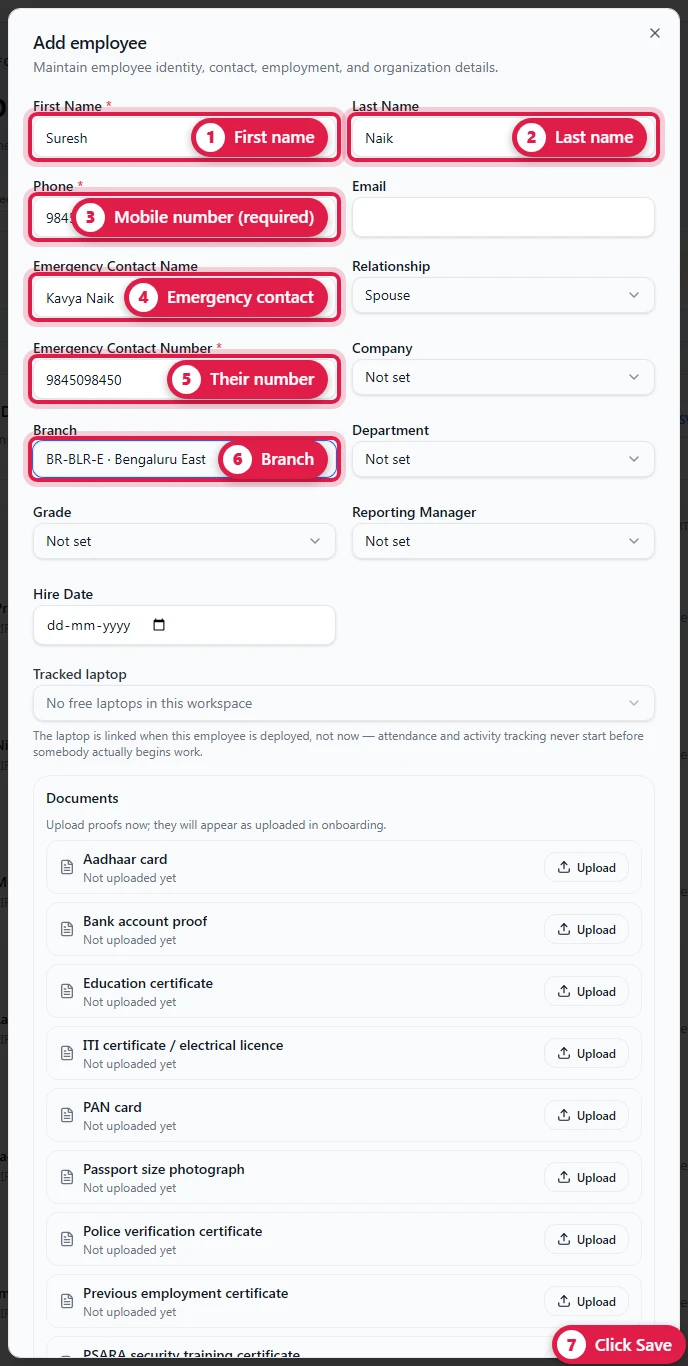
More: Employees.
9. Verify them (KYC)
Sidebar → KYC Verification → Start a KYC case → pick the worker → Open case. Sign off each check (Aadhaar and PAN can come from DigiLocker), add previous employers, then Clear for deployment.
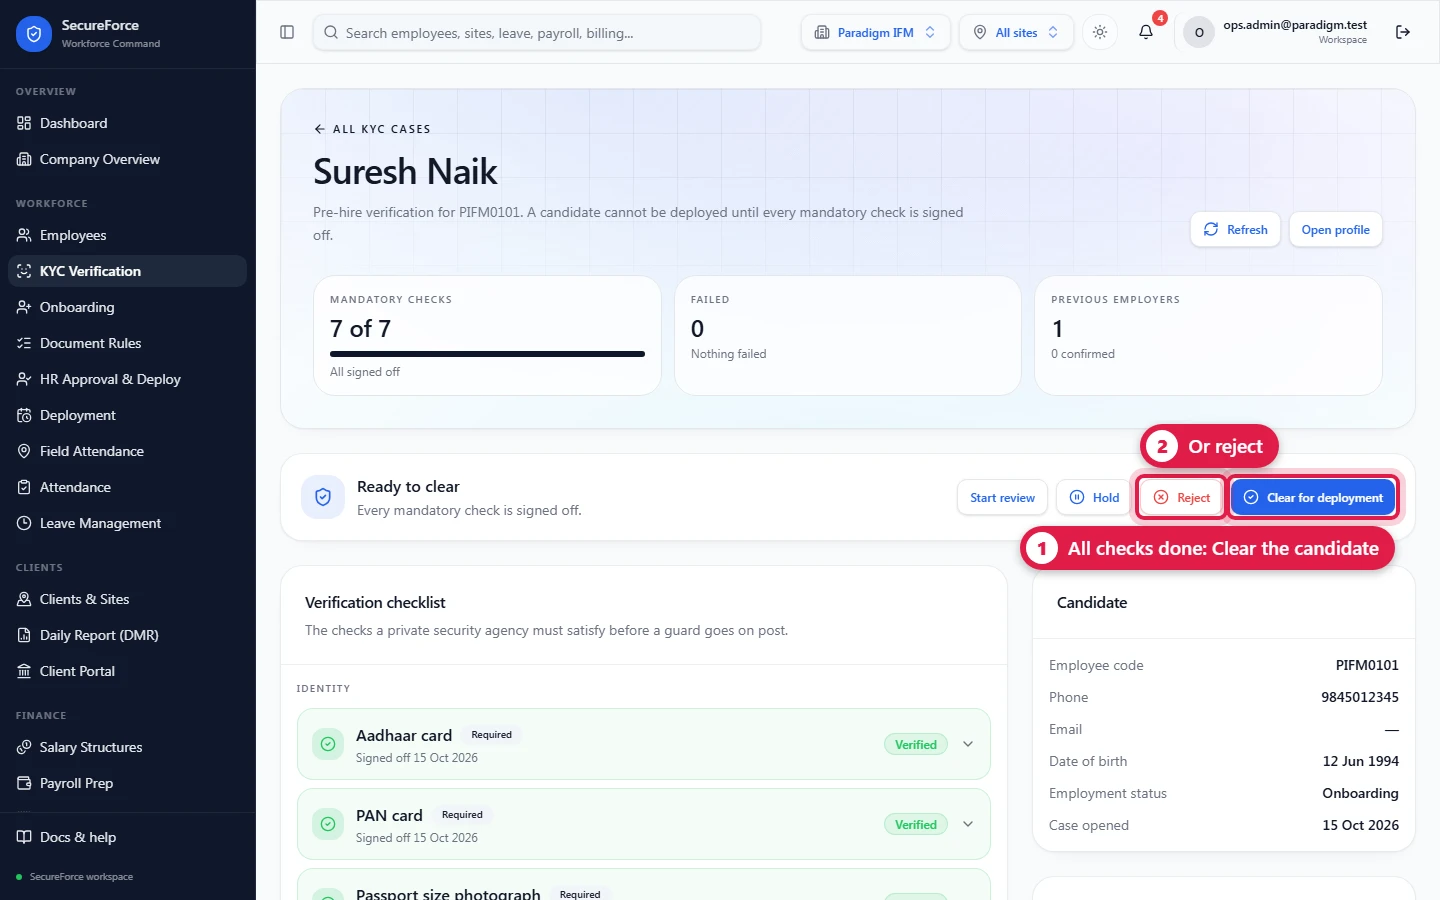
More: KYC verification.
10. Collect their documents
First time only: Sidebar → Document Rules → Add the standard categories, then add which documents each category needs (e.g. PSARA training and police verification for Security Guards).
Then on the worker's Onboarding page, Document Upload: choose their category and designation, upload each required document, and verify it. A document that isn't available yet can be Waived with a reason.
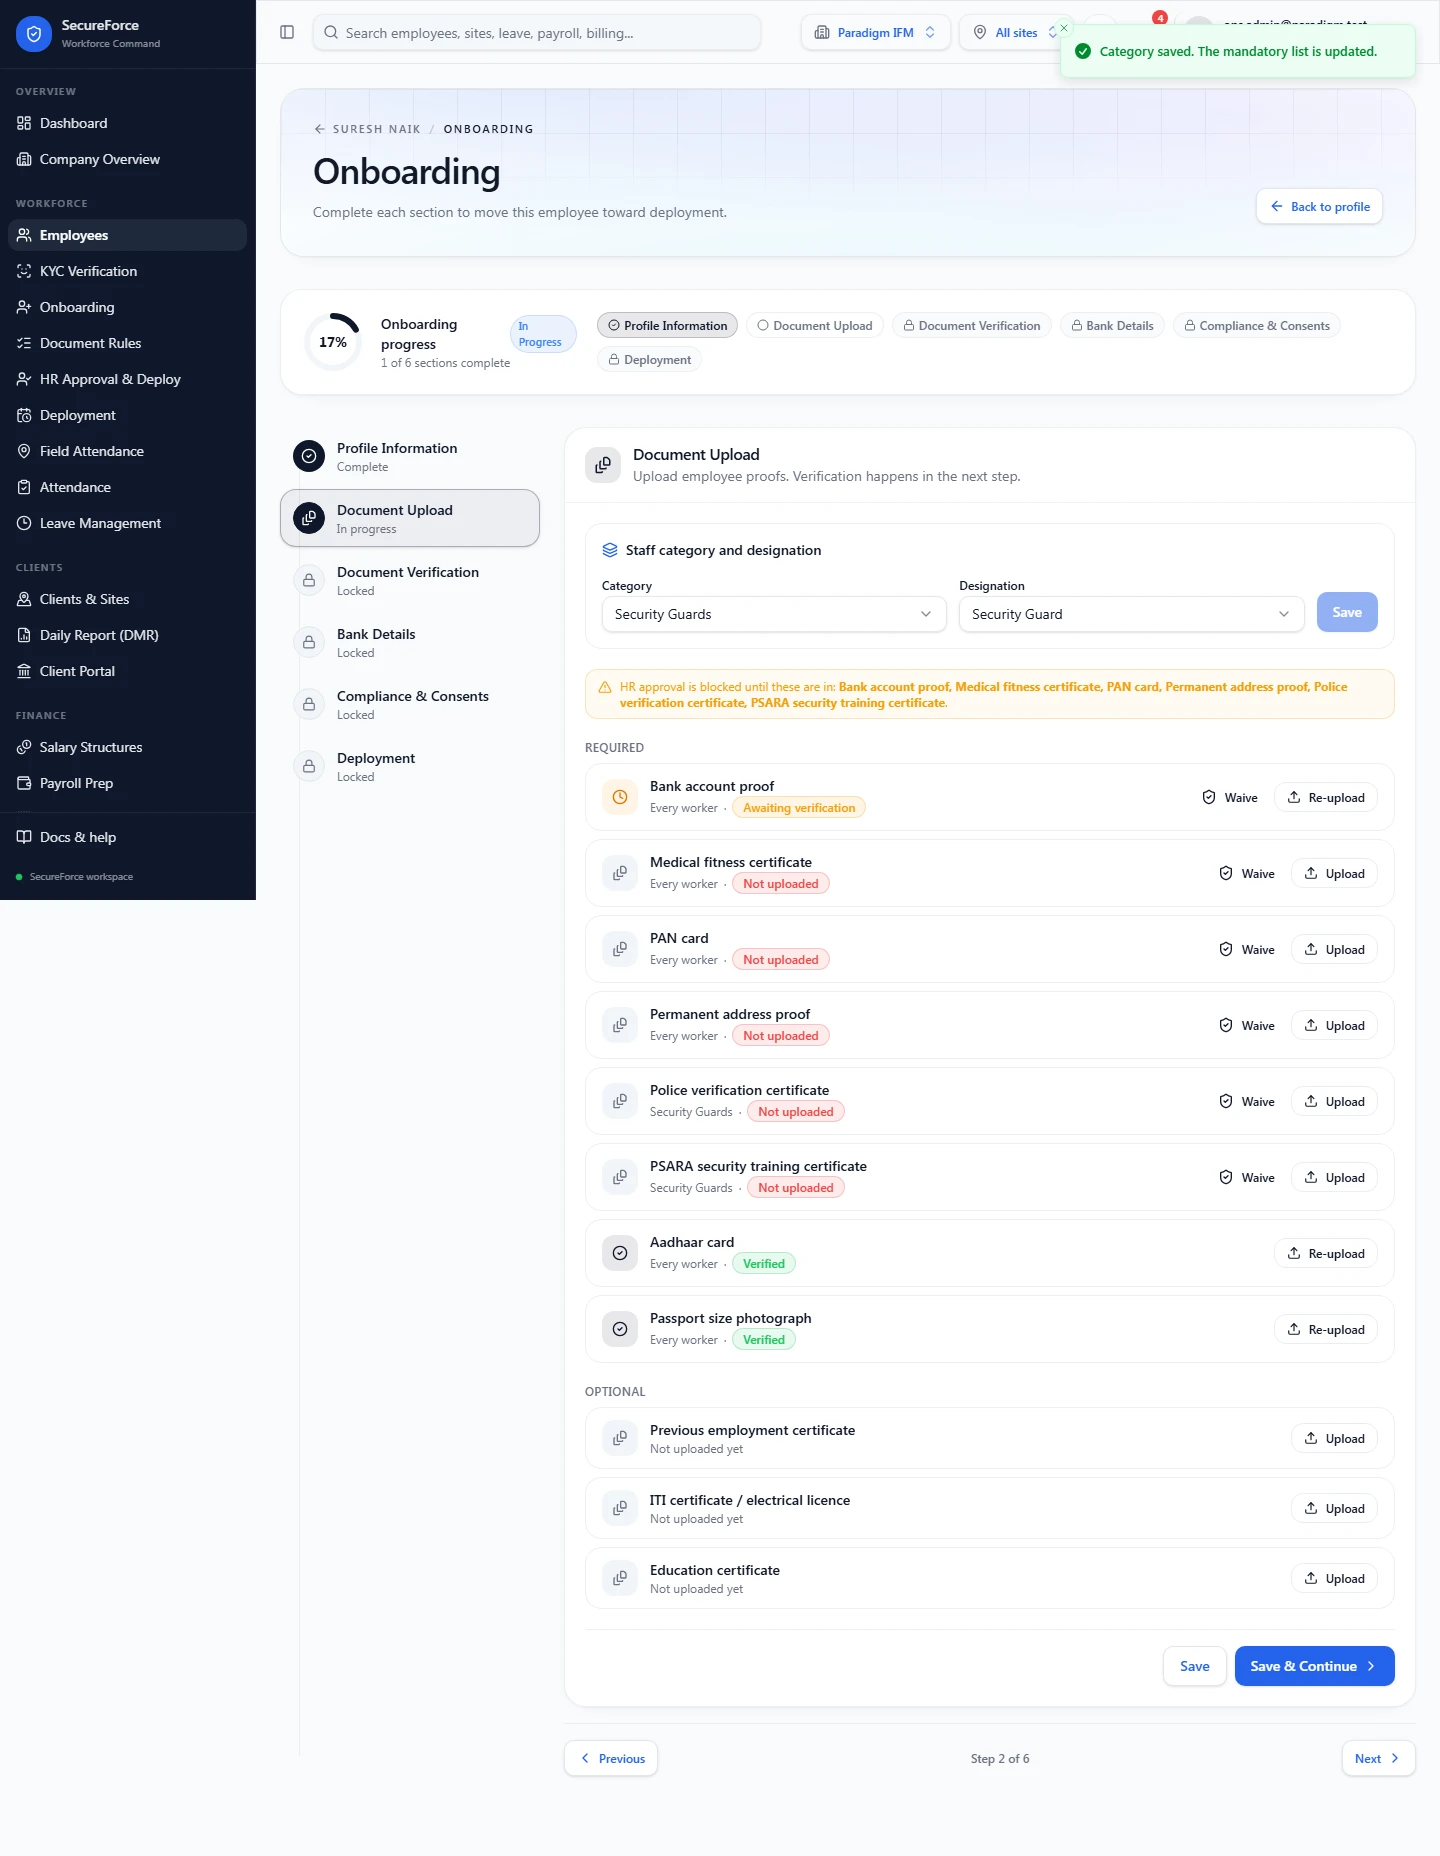
More: Document rules, Onboarding.
11. HR approves them
First time only: Sidebar → Salary Structures → Add salary structure for each role.
Then Sidebar → HR Approval & Deploy → open the worker. When every check is green, pick the salary structure and Prepare approval and contract. Hand the phone to the worker to sign the contract, then press Approve.
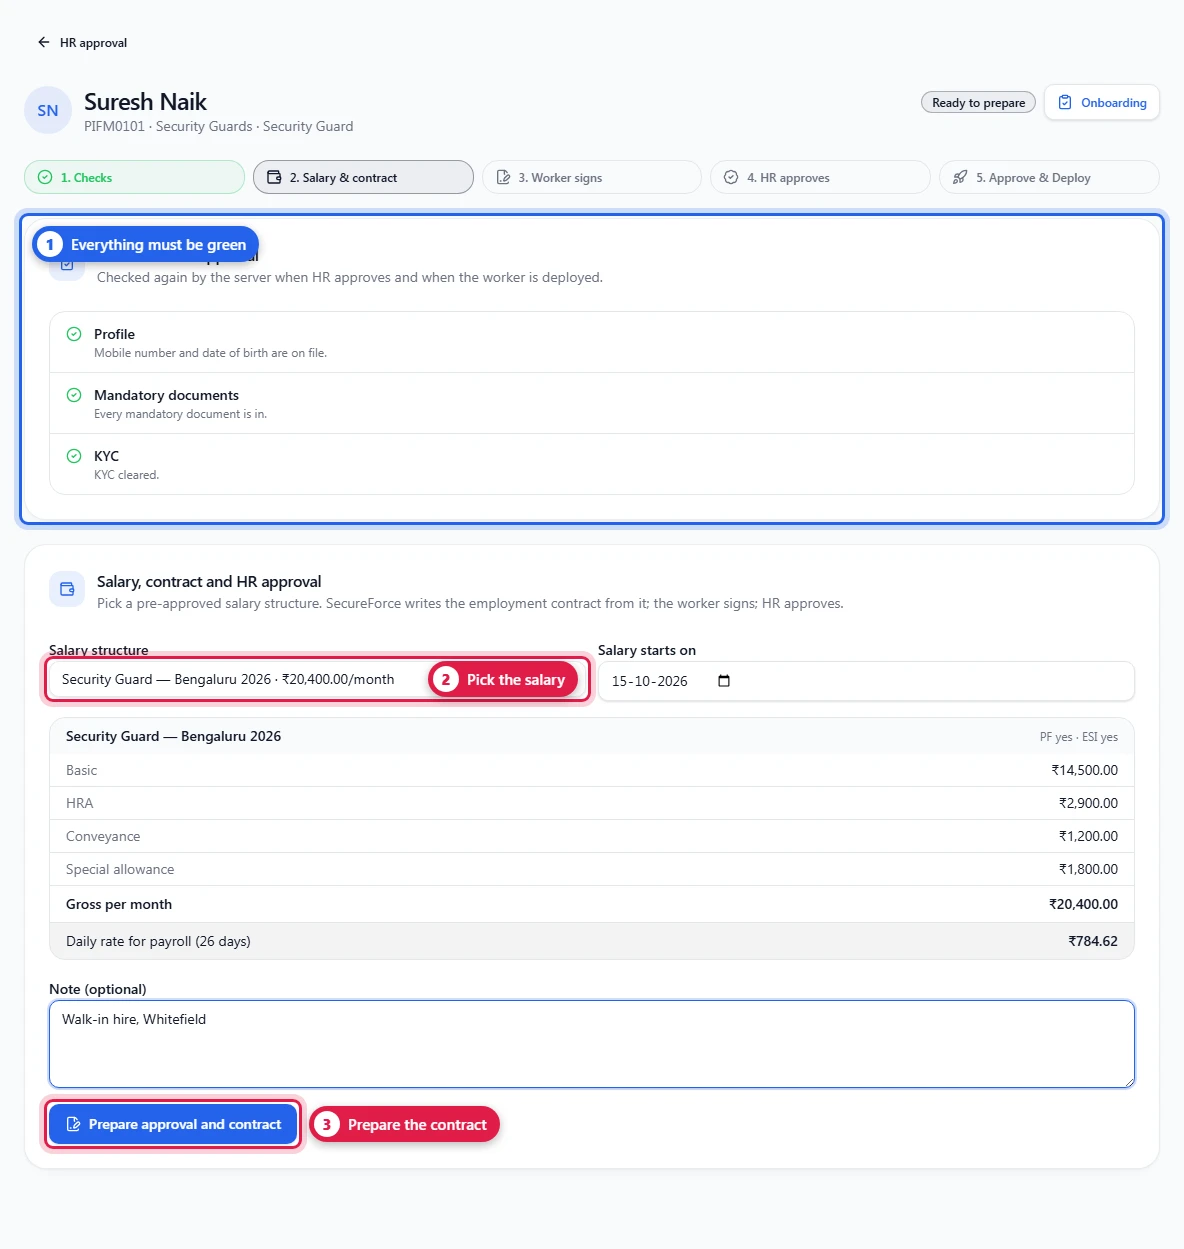
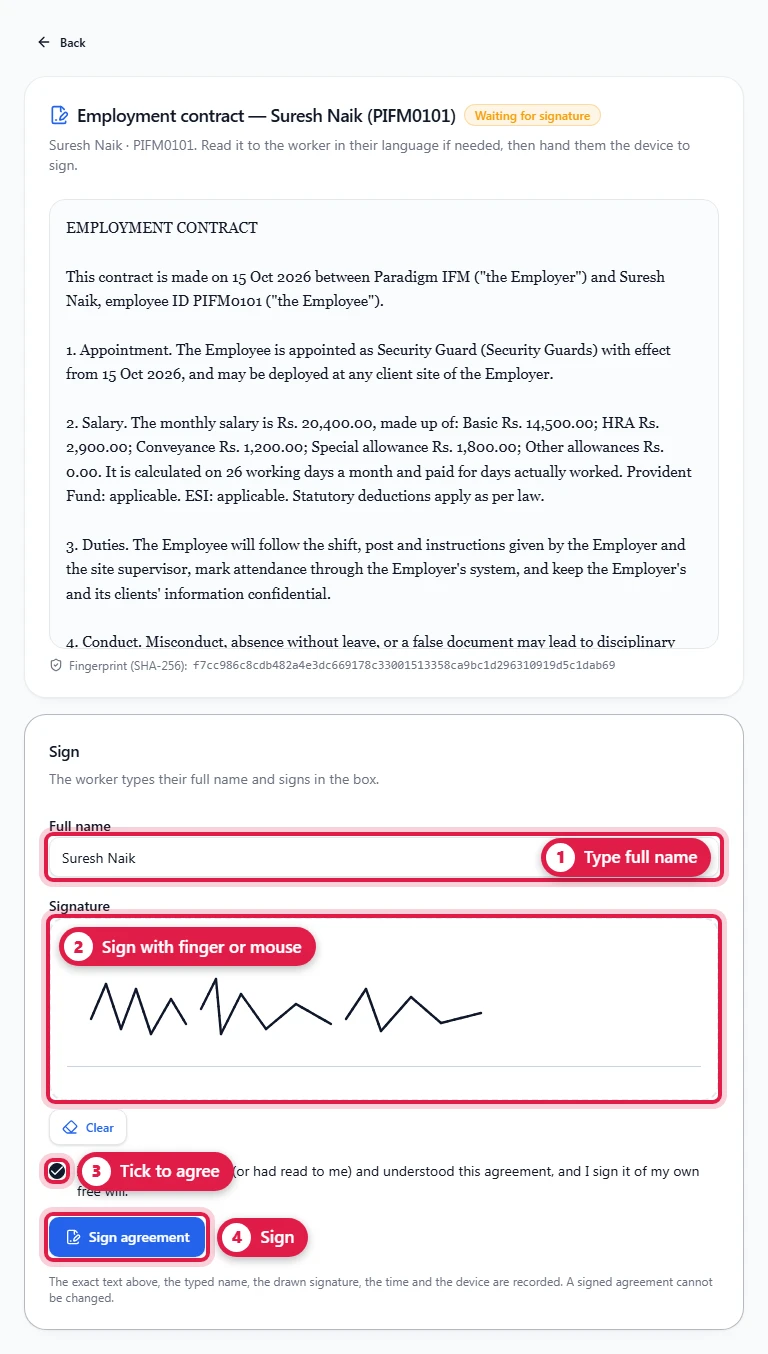
More: HR approval.
12. Approve & Deploy
On the same page: pick the site, the designation, the shift and the weekly off (or Reliever / floater), take a face photo, and press Approve & Deploy. If the site's contract needs the client's NDA, the worker signs it first. One click creates the deployment, rosters the worker, registers their face, and starts payroll and billing.
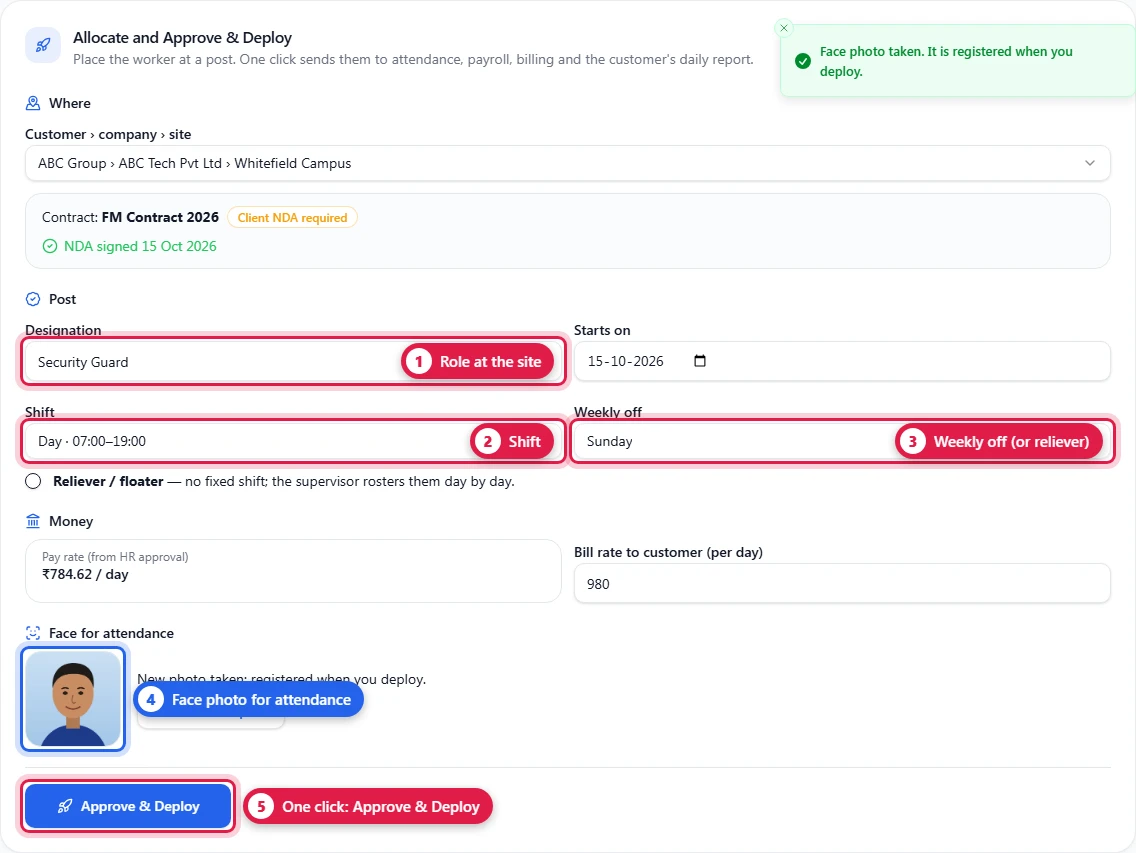
More: Approve & Deploy.
13. The guard checks in
First give the guard a login: Administration → Add member, role Field Employee, the same mobile number as on their employee record. The result must say Linked to their employee record.
Then on the guard's phone: open SecureForce, sign in with the mobile number and password, and allow camera and location. At the site, press Check in, take the photo, press Use photo. The screen shows Present (or Late).
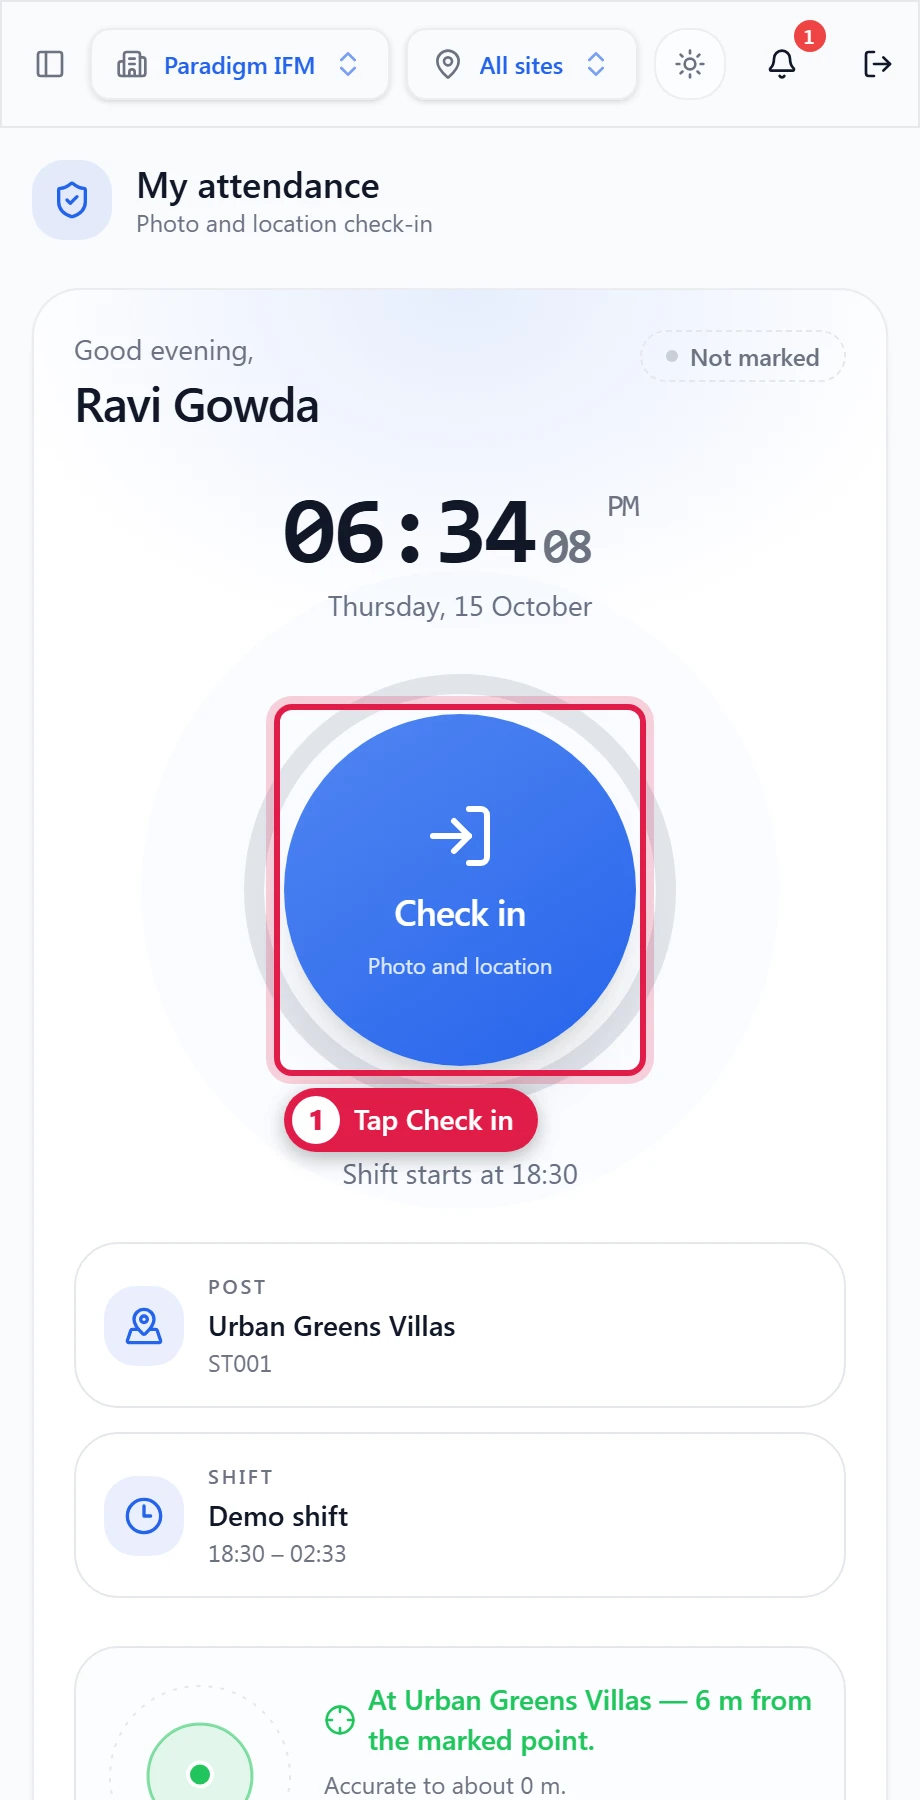
A guard with no smartphone? The supervisor checks them in from Muster → Check in a guard. More: Field Attendance.
14. See it everywhere
- Field Attendance → Today: approved, deployed, present and shortage, for every site.
- Field Attendance → Muster: each person's photo, time and distance from the site; mark, correct and Approve day.
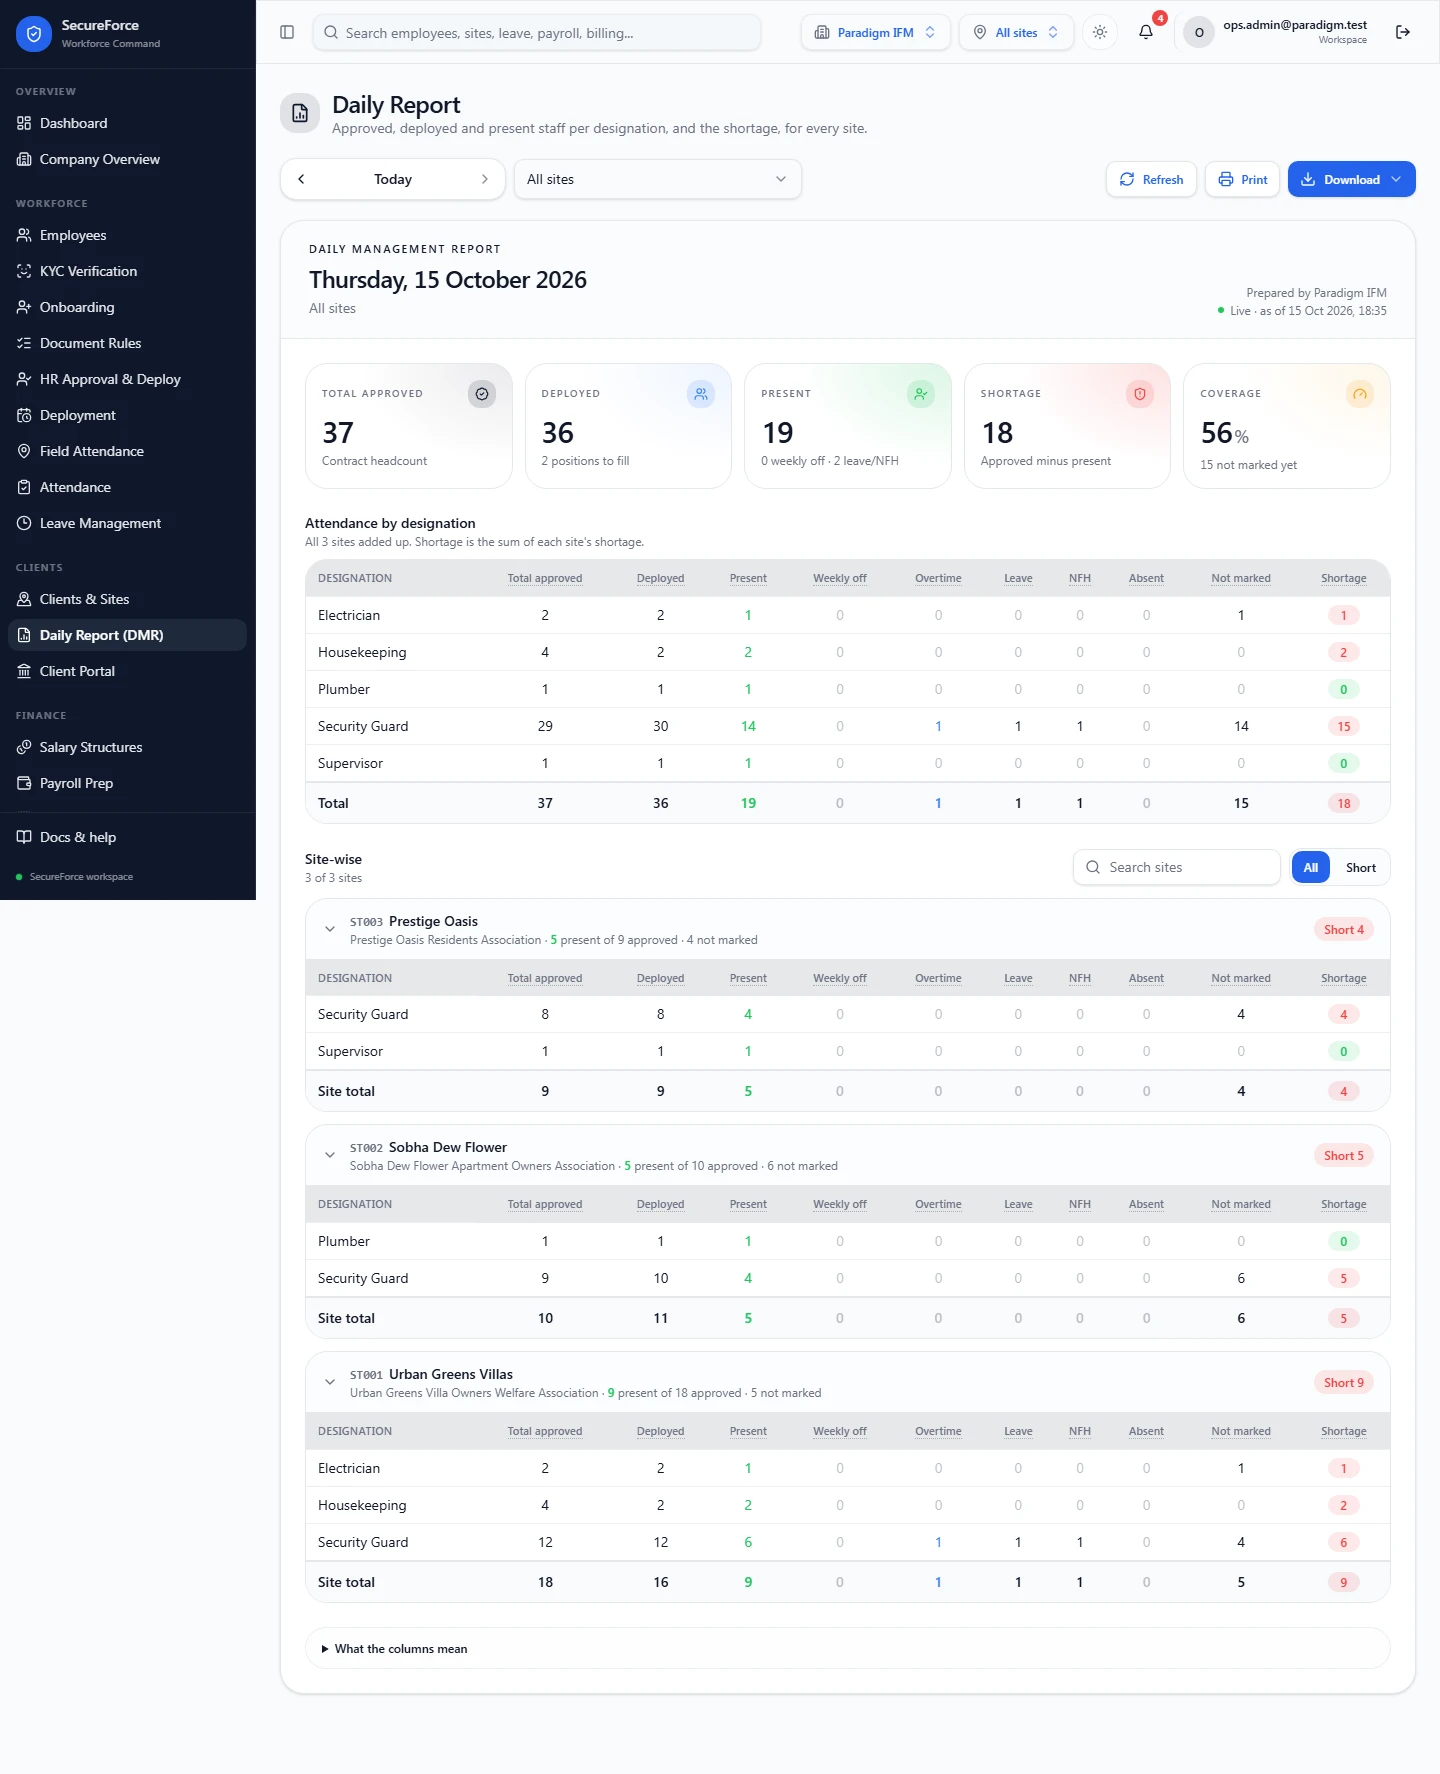
- Daily Report (DMR): the report the customer gets. Download it as Excel.
- Client Portal: what the customer sees with their own login.
- At month end, Payroll Prep and Billing Prep → Generate.
Next: read Core concepts to understand why each step was needed.