Administration
Give people logins and roles, link logins to employee records, limit what each login sees with data scopes, set code numbering, and read the audit log.
Sidebar → Administration (route /administration). It is for admins: anyone with tenant.manage or audit.read. The page has these sections, top to bottom:
- Summary: workspace, members, role grants and data scopes counts.
- Employee Code Settings and Organization and Client Code Settings: numbering.
- Employee Directory: a searchable list of employees.
- Reporting Manager: who can be picked as a reporting manager.
- Email Invitations: invite by email link.
- Workspace Members: add people and change roles.
- Data Scopes: limit what someone sees.
- Role Permissions: what each role can do (read-only).
- Recent Audit Activity: who changed what.
Add a member (give someone a login)
This is the usual way to give guards, supervisors, office staff and customers access. No email is sent; you hand over the details yourself.
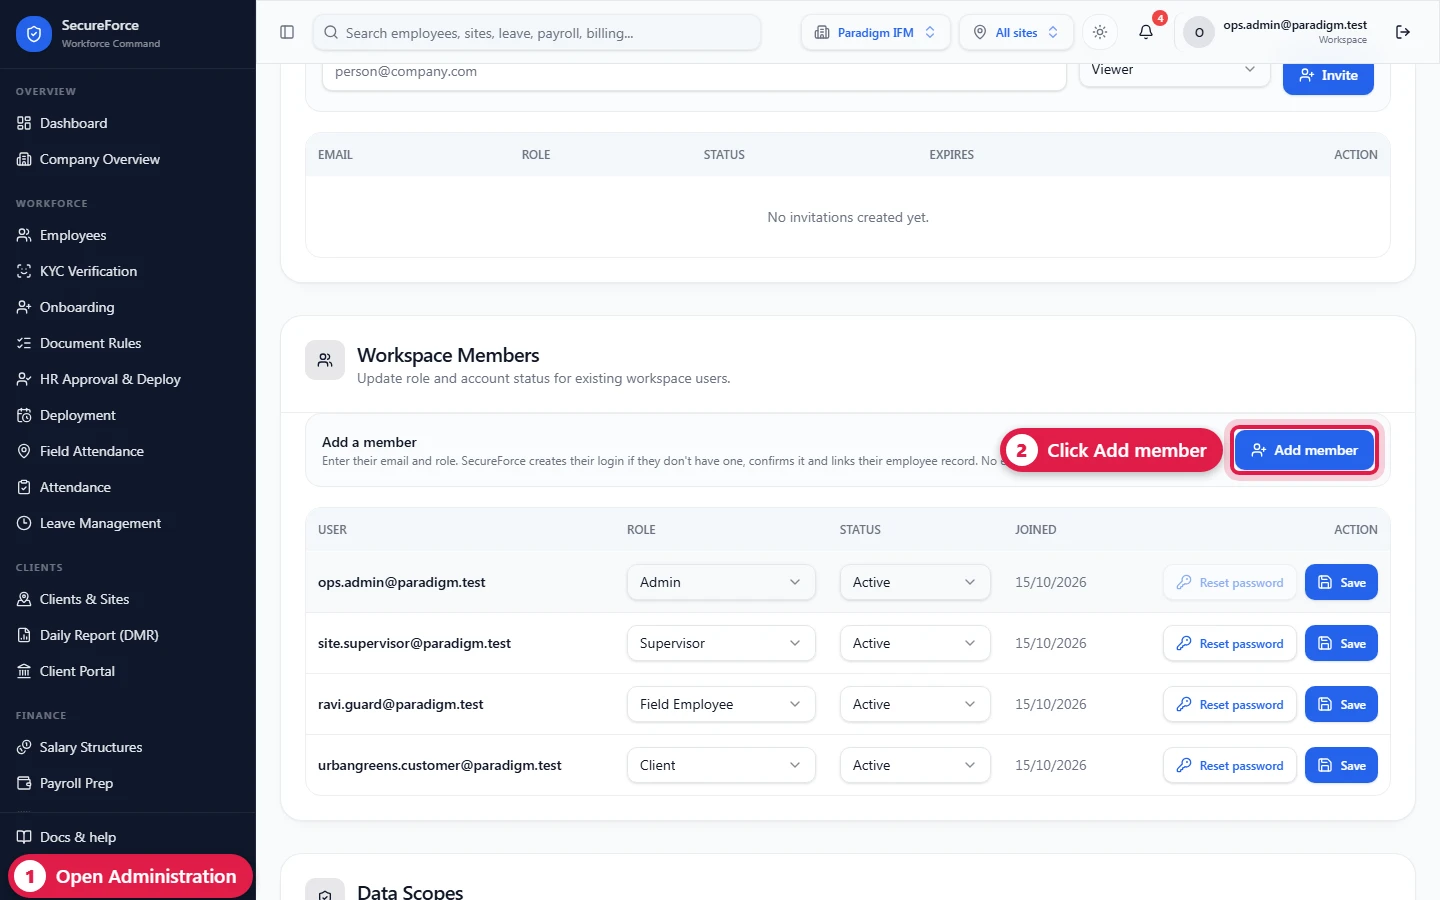
- Workspace Members → Add member.
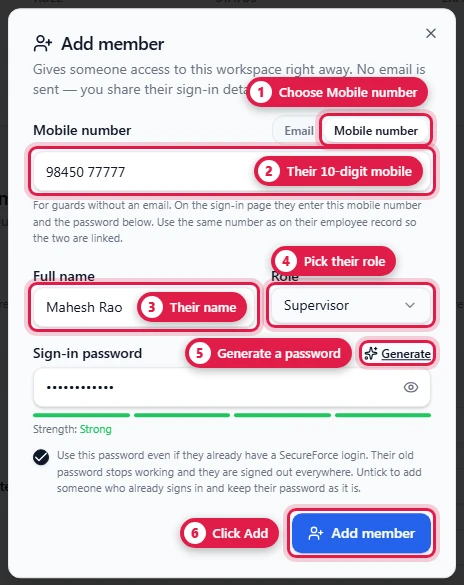
- Sign in with: choose Email or Mobile number.
- Email: for anyone who is an employee, use exactly the email on their employee record.
- Mobile number: for guards without an email. Use the same mobile number as on their employee record. On the sign-in page they type that number in Email or mobile number, plus the password. Choosing the role Field Employee switches to Mobile number when no email has been typed.
- Full name (optional) and Role: Viewer, Field Employee, Supervisor, HR Manager, Ops Manager, Client, IT Admin or Admin.
- Sign-in password: type one or press Generate. If the person already has a SecureForce login (for example from another workspace), tick or untick Use this password even if they already have a SecureForce login depending on whether you want to replace their password.
- Press Add member.
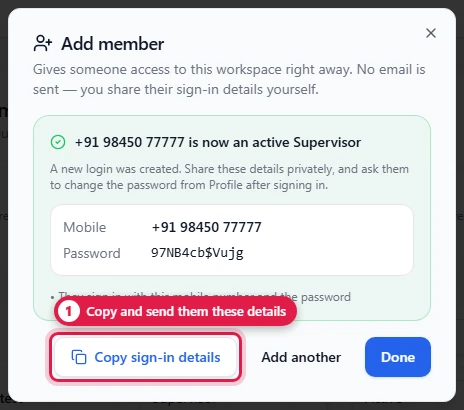
The result lists what happened:
- Email confirmed and access is active.
- Linked to their employee record: the login is now connected to the employee with the same email (or, for a mobile login, the same mobile number). Field employees and supervisors need this to mark attendance. If it doesn't appear, the email or mobile number doesn't match exactly one employee: fix it on the employee record and add the member again.
Press Copy sign-in details and share them privately (WhatsApp or in person), then Done. Add another clears the form.
Adding a member again with the same email or mobile number is safe. It re-applies the role and re-links the employee record.
Mobile-number logins
One account, two ways in. Someone added by Email can also sign in with the mobile number on their employee record, using the same password. There is still only one account and one password. Someone added by Mobile number (no email) signs in with the number only.
A guard with a mobile login has no email, so Forgot password? can't help them. If they forget it, use Reset password in the members table and give them the new one. Everywhere in SecureForce their login shows as their mobile number.
Invite by email instead
Email Invitations: enter an Email and Role, press Invite. The invitation appears in the list with its status and expiry. Use the copy action to get the secure link and send it yourself. The person signs in through the link and the role becomes active.
Change a role, suspend, reset a password
In Workspace Members, each row has a Role and Status (active, invited, suspended) dropdown. Change them and press Save on that row. Reset password sets a new password for the member.
Limit what someone can see (data scopes)
Data Scopes → Assign scope:
- Member: the login to limit.
- Scope type: all, branch, client, site or employee.
- Scope target: the specific branch, client, site or employee.
- Press Assign.
Typical setup:
| Who | Scope |
|---|---|
| Site supervisor | site → their site (add one scope per site if they cover several) |
| Customer login (role Client) | client → their organisation |
| Branch manager | branch → their branch |
Scopes are listed on the right; remove one to widen that person's view again. A role with no scope sees the whole workspace.
Numbering
Employee Code Settings: Prefix (EMP), Start number and Padding (number of digits), with a live Preview (EMP-0001). Press Save. The same controls exist for vendor company, branch, department, service line, grade, client and site codes. New records use the new format; existing codes don't change.
GST and statutory settings
The GST and Statutory Settings card configures tenant defaults for client billing and payroll:
- GST Configuration: enable GST, choose the default treatment, and set CGST, SGST and IGST percentages. Intra-state needs CGST and SGST above zero; inter-state needs IGST.
- Statutory Settings: effective date and PF, ESI and Professional Tax rates, ceilings and PT slabs. Disabled schemes are skipped by payroll.
- Configuration Status: validates percentages and PT JSON before saving. Invalid settings block the update; unsaved changes can be discarded.
Supplier legal name, GSTIN, state code and invoice numbering live in Billing Profile. Client GST identity is maintained in Clients and sites.
Reporting managers
Tick which active employees may be chosen as a Reporting Manager. Only ticked people appear in the reporting-manager dropdown during onboarding.
Audit log
Recent Audit Activity lists inserts, updates and deletes with the record, the actor and the time. Filter by action, entity and number of rows, press Apply filters, open Details to see exactly what changed, and Export for an auditor.